
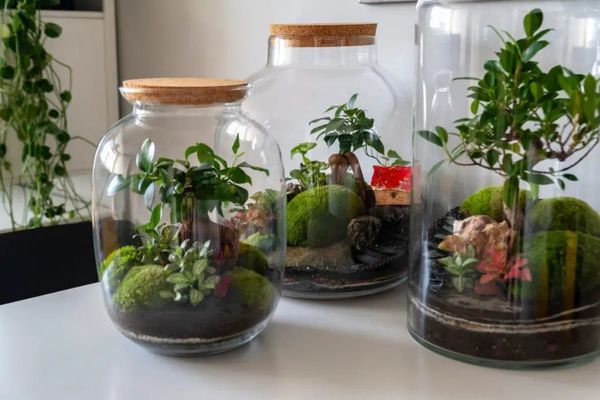
The first time I saw a closed terrarium, I couldn’t believe something so small could contain an entire living ecosystem. It looked like a tiny enchanted forest trapped inside a glass jar, complete with lush green plants, soft moss, and little droplets of water clinging to the glass.
Naturally, I wanted to make one myself.
I quickly discovered that creating a closed terrarium isn’t difficult, but it does require a little planning and attention to detail. Once everything is in balance, nature does most of the work for you. Watching this miniature world thrive with very little maintenance has become one of the most rewarding gardening projects I’ve ever taken on.
If you’ve been thinking about building your own, let me walk you through the process that has worked so well for me.
Understanding How a Closed Terrarium Works
Before I built my first terrarium, I wanted to understand why they could survive for months with almost no watering.
The secret is the natural water cycle.
Inside the sealed glass container, moisture evaporates from the soil and leaves, condenses on the glass, and eventually drips back into the soil. The cycle repeats continuously, creating a tiny self-sustaining environment.
It’s fascinating to watch because it mirrors the same processes that happen in nature, only on a much smaller scale.
Gathering Everything I Need
One thing I’ve learned is that preparing all the materials before starting makes the entire project much more enjoyable.
I usually gather:
- A clear glass container with a lid
- Small pebbles or gravel
- Activated charcoal
- Quality potting mix
- Small tropical plants
- Moss
- Decorative stones or small ornaments
- Tweezers or chopsticks
- A small spoon
Having everything within reach allows me to focus on designing the terrarium instead of searching for missing supplies halfway through.
Choosing the Right Glass Container
The container is one of the most important decisions.
I prefer clear glass because it allows plenty of light inside while letting me admire every detail of the miniature landscape.
Wide openings make planting much easier, especially when arranging several plants.
Before I begin, I always wash and dry the container thoroughly.
Starting with perfectly clean glass helps reduce the chance of mold or unwanted bacteria developing later.
Building a Strong Foundation
Every successful terrarium starts from the bottom.
The first layer I add is small stones or gravel.
This creates a drainage layer that keeps excess moisture away from the roots.
Next comes a thin layer of activated charcoal.
Although it’s easy to overlook, charcoal helps filter the water, minimize odors, and discourage fungal growth inside the enclosed environment.
Only after those layers are complete do I add the potting soil.
I gently shape the soil instead of leaving it perfectly flat, creating little hills and valleys that make the finished terrarium feel more natural.
Choosing Plants That Love Humidity
One mistake I avoided by doing a little research was choosing plants that actually enjoy humid conditions.
Closed terrariums are perfect for tropical species.
Some of my favorite choices include:
- Fittonia
- Small ferns
- Peperomia
- Moss
- Miniature philodendrons
I avoid succulents and cacti because they prefer dry environments and usually struggle inside sealed containers.
Matching the plants to the environment makes everything much easier in the long run.
Planting With Patience
Planting inside a glass container requires slower movements than regular gardening.
Using tweezers or long chopsticks helps position each plant without disturbing the others.
I like placing taller plants toward the back while keeping shorter varieties near the front.
This creates depth and makes the terrarium look larger than it really is.
Once every plant is in place, I gently press the soil around the roots to help them settle.
Adding the Finishing Touches
This is probably my favorite part.
Moss instantly gives the terrarium a mature, forest-like appearance.
Then I add a few carefully chosen decorative details.
Some ideas I enjoy include:
- Small natural stones
- Tiny pieces of driftwood
- Miniature figurines
- Decorative gravel
- Small pieces of bark
I’ve learned that less is usually more.
Leaving open space allows the plants to remain the stars of the display.
Watering Carefully
One of the biggest lessons I’ve learned is that a closed terrarium needs far less water than most people expect.
I lightly moisten the soil using a spray bottle or a small spoon.
The goal is damp soil, never soaked soil.
After closing the lid, I watch the glass over the next few days.
A light mist of condensation is a good sign.
If large droplets constantly cover the glass, I simply remove the lid for a short time to let excess moisture escape.
Caring for My Tiny Ecosystem
Once the terrarium settles into balance, it asks for surprisingly little attention.
Every now and then I:
- Remove dead leaves
- Trim plants that become too large
- Check condensation levels
- Wipe the inside of the glass if needed
Other than that, nature takes care of most of the work.
That’s one of the reasons I enjoy this project so much.
A Small Reminder of Nature’s Balance
Creating a closed terrarium step by step taught me that healthy ecosystems depend on balance rather than constant intervention. Once everything is working together, the plants, soil, water, and air support one another in a quiet cycle that almost feels magical. Every time I look at the tiny forest growing inside its glass home, I’m reminded that nature has an incredible ability to thrive when we simply create the right conditions and allow it to do what it has always known how to do.