
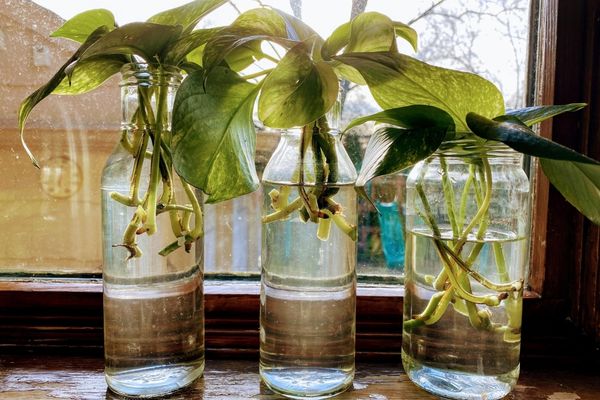
One of the most exciting moments in my gardening journey happened when I realized I didn’t always need to buy new plants. With nothing more than a healthy cutting, a glass jar, and a little patience, I could grow an entirely new plant from one I already owned.
The first time I watched tiny white roots emerge from a simple stem sitting in water, I was amazed. It felt almost magical, like witnessing one of nature’s quiet miracles unfold right on my kitchen windowsill.
Since then, water propagation has become one of my favorite gardening projects. It’s simple enough for beginners, fascinating to observe, and incredibly satisfying. If you’ve never tried it before, I’d love to share everything I’ve learned along the way.
Why I Love Water Propagation
When people ask me about the easiest way to multiply houseplants, water propagation is always my first recommendation.
It’s affordable, beginner-friendly, and incredibly rewarding because you can actually watch the roots develop. Every few days there’s something new to discover, making the whole process feel like a tiny science experiment taking place inside your home.
Some of the reasons I enjoy this method are:
- It requires very little equipment.
- It’s perfect for beginners.
- Root growth is easy to monitor.
- It helps expand my plant collection for free.
- It’s a wonderful way to share plants with friends.
Every successful cutting reminds me that plants naturally want to grow—they just need the right conditions.
Choosing Plants That Root Easily
One lesson I learned quickly is that some plants are naturally better candidates for water propagation than others.
Whenever I’m introducing someone to this technique, I recommend starting with reliable species that root quickly and consistently.
Some of my favorites include:
- Pothos
- Heartleaf Philodendron
- Monstera
- Spider Plant
- Tradescantia
- Coleus
- Lucky Bamboo
- Mint
- Basil
These plants often begin producing roots within just a couple of weeks, making them encouraging choices for beginners.
Starting With a Healthy Cutting
Everything begins with selecting the right stem.
I always choose healthy growth that’s free from yellow leaves, pests, or signs of disease. Using clean scissors or pruning shears, I make the cut just below a node, since this is where new roots naturally develop.
Before placing the cutting in water, I remove any leaves that would sit below the surface.
Keeping submerged leaves out of the water helps prevent rot and keeps the water much cleaner.
Picking the Right Container
One of my favorite parts of propagation is choosing attractive containers.
Clear glass jars are especially fun because they let me watch every stage of root development.
I regularly use:
- Small mason jars
- Vintage glasses
- Narrow glass bottles
- Tiny vases
- Recycled food jars
They serve two purposes at once—they help new plants grow while also becoming beautiful decorative pieces around the house.
Keeping the Water Fresh
I used to think I could simply leave the cutting alone until roots appeared.
Experience taught me otherwise.
Changing the water every few days keeps it fresh, oxygen-rich, and much healthier for developing roots.
Whenever I replace the water, I also rinse the container to remove any buildup.
This small routine has made a huge difference in the success of my propagations.
Giving Cuttings the Right Light
Finding the perfect location is easier than many people think.
Bright, indirect sunlight works best.
Strong afternoon sun can overheat the water and stress delicate cuttings, while dark corners slow down root development.
Some of my favorite spots include:
- Kitchen windows
- Bright office shelves
- East-facing windows
- Dining room sideboards near natural light
Warm temperatures also encourage faster rooting, so I avoid placing cuttings near air conditioners or cold drafts.
Watching Nature at Work
The waiting period has become one of my favorite parts of gardening.
Each morning I glance at my jars to see whether anything has changed.
First, tiny white bumps appear around the node.
Soon those bumps stretch into delicate roots.
Then the roots become longer, stronger, and begin branching into an entire root system.
It never gets old.
Even after propagating dozens of plants, I still find myself excited every time I notice the first signs of new growth.
Knowing When to Move to Soil
Patience is especially important during this stage.
I usually wait until the roots measure about one to two inches long and have started branching before transplanting.
Once the cutting moves into soil, I keep the potting mix slightly more moist than usual for the first couple of weeks.
This gentle transition helps the new roots adapt without unnecessary stress.
Mistakes That Helped Me Improve
Like most gardening skills, water propagation became easier after making a few mistakes.
Some of the most common ones I’ve experienced include:
- Leaving leaves underwater
- Forgetting to replace the water
- Using weak or unhealthy cuttings
- Exposing jars to direct sunlight
- Crowding several cuttings into one container
Each mistake taught me something valuable that improved my next attempt.
A Simple Way to Grow Your Collection
Nowadays, I rarely throw away healthy plant trimmings.
Instead, I place them in water and let nature take over.
Some become thoughtful gifts for friends.
Others grow into beautiful new houseplants for empty corners of my home.
It’s amazing how something that once seemed like garden waste can become an entirely new plant with just a little patience.
Every New Root Tells a Story
Learning how to propagate plants in water completely changed the way I look at gardening. Instead of seeing pruning as the end of a stem’s journey, I now see it as the beginning of another one. Every cutting reminds me that growth often starts quietly, hidden beneath the surface before anyone notices. Watching those first roots appear never loses its magic, and it continues to inspire me to slow down, trust the process, and appreciate the incredible resilience of every plant I grow.